


5:45 pm
September 25, 2011
 Offline


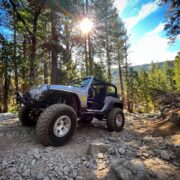
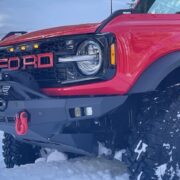
I have ordered some Crusher Corners to cover up some body damage that occurred on the White jeep. I will do a write up on the install when the items arrive.
Stay Tuned..
Huck


4:26 pm
September 25, 2011
Offline They have arrived along with the LED brake and reverse lights. They are bare steel so the first step is going to be to drill the body and put all the nut serts in and cut the body to accommodate the LED light holes. Then we will pull them off and paint/powdercoat them and install for the final time. Anyone have a good nutsert installation tool? I have one we got from Harbor Freight but its pretty cheaply made and works so-so.
Huck


5:31 pm
Club Member
September 3, 2008
Offline No nutsert tool here, but let me know when I can come over and watch.
Um...what?
10:09 pm
September 25, 2011
Offline 
This was a fun project, now time for the recap. I want to first start by saying the right tools make everything easier and work better. Before I started cutting and drilling on the Jeep I wanted to make sure I had every tool I would need and every tool required for the install according to the instructions. This meant sourcing a 17/32 drill bit, 2 3/4″ Hole Saw, and Marson 325 NutSert tool. The skins came with a “tool” of sorts, basically a bolt with a couple of nuts, but after reading numerous articles about how to do it right the Marson tool was the way to go.
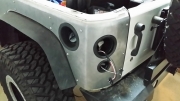
To begin the project you have to not only remove the tail lights and license plate you have to cut out the sheet metal where the tail light screws in to leave the body as flat as possible. I used an air saw and later switched to a dremel type tool. The sheet metal is doubled in the areas that have to be cut which makes it hard for a straight blade to work.
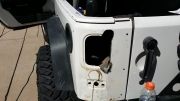
Next is to place the armor flat against the vehicle and clamp it in place making sure to align the edges with the vehicle contours. Luckily for me I have about 10 clamps from a cabinet project I did a few years ago. Once you have it where you want it and it is secure you drill pilot holes for the nutserts and mark the spot for the reverse lights.

Next you remove the armor and drill out the holes to 17/32 to accommodate the nutserts. This is where having the Marson tool came in handy. Each nutsert tool about 5 seconds and all were perfectly centered. Having done the side armor last year this tool is a 1000% improvement over the tool at Harbor Freight and the “free” bolt tool provided. With the nutserts in place next was to test fit the armor. and repeat on the passenger side. I would like to say every screw was 100% aligned, but the truth is while the pilot hole was perfectly aligned, drilling it out with a larger bit allowed for variance. I did have to enlarge about 2 holes a side to make all bolts align with out stripping them. The armor also required the clamps for holes to line up.
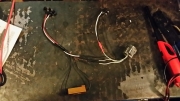
Now that I had the armor on there was a bit of electrical to tend to. The instructions have you reuse the pigtail coming off the factory tail light, a resistor of the LED turn signal, and two wiring pigtails one for the Red LED and one for the White LED as shown below.
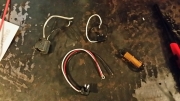
While the kit comes with quick connects I chose to solder and cover with heat shrink the connections to ensure they wouldn’t come free on the trail due to vibration. The finished wiring harness looks like this. The Orange resister is applied to the blinker signal. Apparently without the resister the blinker flashes sporadically and can cause the computer of the JK to throw codes.
10:22 pm
September 25, 2011
Offline Continued..
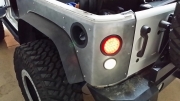
With the pigtail created it was now time to install the lights and verify everything works correctly. The lights come with black rubber grommets and lights simply press in to the middle. The pressure of the rubber to the edge of the metal keeps everything in place. Here is the corner wired and ready for the lights.
Here is the corner completed and lit up in reverse.
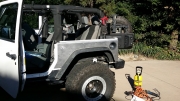
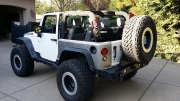
While the sides aren’t staying silver they will for the next few days. My plan is to get them powder coated black but I haven’t scheduled that appointment yet. I will post up once I have them back from the powder coater. The instructions warn about painting or powder coating before final installation. After working on these I understand why. If you were to look closely at the bare metal you might find some scratches or “oh darn”s that happened while I was enlarging a couple of holes to get all the bolts to line up. I feel confident I can take them off, powder coat, and reapply them with out them getting scratched at this point.
I welcome your thoughts or questions.
Huck
7:57 am

Club Member
January 19, 2011
Offline Looks goods Jason. Thanks for sharing the information!
Semper Fi
11:26 am
Club President
April 2, 2003
Offline Looks great jason!
9:55 pm
September 25, 2011
Offline Got the sides back from power coat today. If you need something powder coated I recommend All Star Powder Coating in Roseville. Very reasonable and 24 hour turn around. I dropped them off on Tuesday and picked them up today. Plus the owner is a wheeler and has a pretty nice Land Cruiser powder coated blue. Install went smooth at first then I had a nutsert spin on the passenger side. Luckily, it wasn't too bad. I cut the bolt head off and removed the skin. Then I held the nutsert with a visgrip and grabbed the bolt and freed it. I was able to clean the threads and apply a little more pressure to lock the nutsert in place. Then the skin went on and had no other challenges. The nutserts are very "soft" and I recommend having a kit that can chase the threads or clean the bolts if they become stripped or show too much resistance. The bolts should almost go in half way just with your hand. To close they are installed with the lights hooked up and they look great. Everyone in family agrees they look better with the hard top off. With the hard top on its too much black. Can't wait for summer and MOAB!


Huck
8:02 am
Club President
April 2, 2003
Offline The project came out sweet!
10:49 am

Club Member
January 20, 2009
Offline Looks good!
4:06 pm
September 25, 2011
Offline Thanks.. A final shot outside. This weekend I will be working on the Atlas and HD crossmember.
Huck

1 Guest(s)

