
Guest former user
Guest former user
"TomD" wrote: Any place called "the hammer" I'm staying away from! I've seen those pics and NONE of them include XJs ... but thanks for playing! 😁
T
=====
You're not looking hard enough. 😁


"TomD" wrote: Any place called "the hammer" I'm staying away from! I've seen those pics and NONE of them include XJs ... but thanks for playing! 😁
T
=====
You're not looking hard enough. 😁
"JohnDF" wrote: You don't want a lot of body at the Hammers...ask Keane 😂
It's not having a lot of body that's the problem. It's wanting to keep it in decent shape that's the problem. 😂
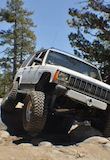
That looks like the opening obstacle on Sledge. That first rig isn't high enough...I bet he got stuck 😁
Hope to be finishing my steering before too long. I have the ZJ tie rod and drag link. Ball joints are good but the ball joint boots need to be replaced. At the same time, will install a ZJ pitman arm (1" drop from OEM) and a modified XJ track bar mount (also with 1" drop) to improve steering angles and get additional droop.
When this all actually starts happening, will include pics.
=====
Been a while but have made a little progress. Replaced the XJ tie rod with the v8ZJ unit and replaced the boots at the same time. Pictures don't do it justice ... WAY bigger. Did my "garage alignment" then headed off to get the new tires.
Have a set of 33x13.50/15 Toyos on there now and had the alignment checked at the same time. I guess I need more practice as it was off a long ways on the toe but caster was right on. All looks good.
=====
Observation: after playing on the beach and dunes at Pismo a couple of weeks ago with Derek and Camilo, I found that my "newly completed" alignment was off. Tires were not wearing but steering wheel was about 15* to starboard. Only thing I can think is the steering box/frame got tweaked somewhat during all the fun.
Already had it in my head to reinforce the frame later for crawling but have decided to make that a more immediate priority. I have a set of inner and outer reinforcements on the way from C-Rok and will get those installed before resetting the alignment. Then, we'll see how that changes things.
=====
The steering wheel will often end up off-centered from wheeling. Could be a bent tie rod, loose jam nuts, bent track bar, or a host of other things that can get bent or loosened up. Doesn't mean your frame is bent, if you had a frame to begin with 😁
"JohnDF" wrote: The steering wheel will often end up off-centered from wheeling. Could be a bent tie rod, loose jam nuts, bent track bar, or a host of other things that can get bent or loosened up. Doesn't mean your frame is bent, if you had a frame to begin with 😁
True enough and I'll check all those out as well. As there was no unusual wear pattern on the tires I figuring it is limited to non-toe items.
There is also a lowered track bar and pitman arm in the future ... maybe not the distant future.
Oh you "body on frame types" are all the same. 😀
=====
Made an important modification over the weekend ...
Attached files 
Thought I'd do a quick update on the progress on the XJ.
Most recent modifications and repairs included a new alternator and battery which made a most inconvenient exit while at Pismo Beach. Again, a big THANK YOU to Derek and Kyle from the JeepForum for running Ronie and I around to get parts then helping with R&R in the campground. A special "shout out" to PismoXJ99, also from JeepForum, who happened to be working that night and got us started on the right track then came by later to check on progress before heading home.
After running the dunes a bit for a couple of days, I found the steering wheel a bit off center again. Afraid this might have been more than just a need for a realignment, I purchased the C-Rok inner and outer steering box reinforcement plates. Between those and the Warrior Products steering box brace I do not think I'll be worrying about that area again.
Also in my pile of pieces is the Go-fer-it for flipping the driver side tie rod and a v8ZJ pitman arm. That will get the tie rod on top of the driver side knuckle for clearance and the pitman arm is about a 1" drop from stock. With the v8ZJ, the "bump steer" is said to be minimal to nonexistent so I'll let you know how it works out for me.
After that, I'm going to replace the remainder of the "block off" screws on my running gear and install grease zirks … then spend the remainder of the afternoon greasing them all. GEEZ, there are a bunch!
Well, that ought to keep me out of trouble for a few days anyway. I do have some plans for getting the spare tire inside while still having room for all the trail gear. Between that and taking care of the floor rust discovered a few weeks ago and the headliner that now touches my head, my summer is about set for Cherokee related doings … short the trails and camping of course.
The higher dollar updates and modifications I want to get accomplished (re-gearing, rock rails and frame stiffening) will need to wait until my budget catches up.
=====
It's been a long time since I've updated my build thread which isn't really an issue as I've been playing and not building. After a run this last weekend, it became VERY apparent the mods that have been done so far need to have the final details completed to bring it all together.
If you can see well enough, in the pic below you can just see there is about a 1" gap between the fender flare and the fender … it's kind of in the shadow. You can see the dent, etc where the tire jammed into the lower part of the front fender buckling it. No major damage. Just need to take out inner fender stuff and "pop" back out. Then … commence with more fender trimming!

After the front fender trimming, I've got the following items on my list in some rough order of getting them done with time and money allowing:
1 - Trim rear fenders.
2 - C-Rok frame kit (steering box) and Warrior Products steering brace (already got them)
3 - install skids: factory stuff, but better than nothing at this point (already got them)
4 - 1" drop Pitman arm (already got it)
5 - driver side tie rod flip w/ go-fer-it (already got it)
6 - extend E-brake cables
7 - external CB antenna
8 - rocker guards
9 - winch (good one!)
10 - roof rack
11 - weld on frame stiffeners and brace the CADB
And in the midst of all this there is re-gearing, doing SOMETHING with the headliner over driver's head (PITA) and fix the rust spot under the front passengers feet.
For the headliner, why not cut a small hole and spray in the spray adhesive - then just push it up. The tack will hold until it dries.
Unless you have a torn/hanging down problem....
"BKGM Jeepers" wrote: For the headliner, why not cut a small hole and spray in the spray adhesive - then just push it up. The tack will hold until it dries.
Unless you have a torn/hanging down problem....
Nothing horrific ... just lost it's adhesion.
=====
"TomD" wrote: [quote="BKGM Jeepers"]For the headliner, why not cut a small hole and spray in the spray adhesive - then just push it up. The tack will hold until it dries.
Unless you have a torn/hanging down problem....
Nothing horrific ... just lost it's adhesion.
=====
Then you've got an easy fix! The spary adhesive is available at auto parts stores for men, and craft stores for women! 😂
I think I paid about $6 for my can... From the AUTO PARTS store!
"BKGM Jeepers" wrote: [quote="TomD"][quote="BKGM Jeepers"]For the headliner, why not cut a small hole and spray in the spray adhesive - then just push it up. The tack will hold until it dries.
Unless you have a torn/hanging down problem....
Nothing horrific ... just lost it's adhesion.
=====
Then you've got an easy fix! The spary adhesive is available at auto parts stores for men, and craft stores for women! 😂
I think I paid about $6 for my can... From the AUTO PARTS store!
That beats the heck out of R&R. Between that and POR 19 for the rusted spot on the floor, I think I'll be good for those projects. Debating whether to put the carpeting back in or put some kind of coating on the floor. No carpeting = more noise.
=====
Yes more carpeting does = more noise.
However, my only attempt at no carpeting failed because of another reason. I couldn't stand the heat that transferred into the interior.
I've run carpeting ever since unloading my CJ-5.
My carpeting rotted out 😁
I just threw in some nice floor mats and called it good 😎
"JohnDF" wrote: My carpeting rotted out 😁
I just let the leaves and pine needles build up and called it good 😎
Fixed it for you.
😏
"Justin" wrote: [quote="JohnDF"]My carpeting rotted out 😁
I just let the leaves and pine needles build up and called it good 😎
Fixed it for you.
😏
Don't forget dead spiders...dampens the sound nicely.
"TomD" wrote: [quote="BKGM Jeepers"]For the headliner, why not cut a small hole and spray in the spray adhesive - then just push it up. The tack will hold until it dries.
Unless you have a torn/hanging down problem....
Nothing horrific ... just lost it's adhesion.
=====
The headliner has a foam backing that is disintegrating. Another option is to use upholstery pins from Walmart. You know the ones the the clear plastic head and spiral wire that people use to hold on the armrest covers. New headliner material is available on eBay or mail-order. Or you could just remove it and paint a mural.
http://www.yourautotrim.com/auheclvifa.html
"RockinCrawler" wrote: [quote="TomD"][quote="BKGM Jeepers"]For the headliner, why not cut a small hole and spray in the spray adhesive - then just push it up. The tack will hold until it dries.
Unless you have a torn/hanging down problem....
Nothing horrific ... just lost it's adhesion.
=====
The headliner has a foam backing that is disintegrating. Another option is to use upholstery pins from Walmart. You know the ones the the clear plastic head and spiral wire that people use to hold on the armrest covers. New headliner material is available on eBay or mail-order. Or you could just remove it and paint a mural.
http://www.yourautotrim.com/auheclvifa.html
Thanks for the link. There are a couple of small tears from the OO I want to sew up before "re-sticking". Sorry to disappoint you Richard, no murals in my future.
=====
What I accomplished this weekend. So far it's only the front as I had to do some repairs anyway. Shouldn't be concerned about self-imposed carnage now ...
Attached files 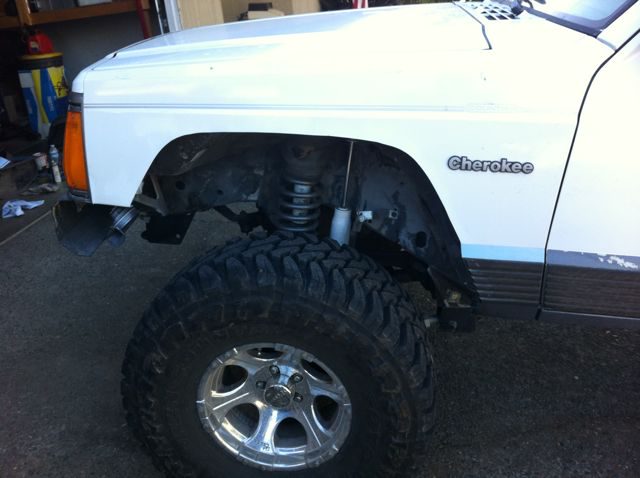
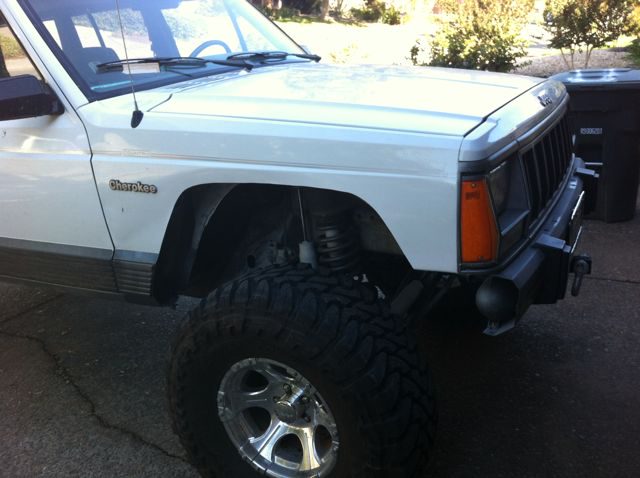
Oh, and after I showed Ronie the finished work the first words out of her mouth are "But now the tires look so small. Do you need 35s?"
I love that woman. :girly:
=====
"TomD" wrote: Oh, and after I showed Ronie the finished work the first words out of her mouth are "But now the tires look so small. Do you need 35s?"
I love that woman. :girly:
=====
Hold on to that woman, she's a keeper 😉
"JohnDF" wrote: [quote="TomD"]Oh, and after I showed Ronie the finished work the first words out of her mouth are "But now the tires look so small. Do you need 35s?"
I love that woman. :girly:
=====
Hold on to that woman, she's a keeper 😉
x2!
Sign in to post here.