Don't Forget, meetings have moved to our new location @ Mark and Monica's Family Pizza, 4751 Manzanita Ave., Carmichael, CA 95608!


7:45 am
Club Member
February 26, 2014
 Offline


very nice
7:56 am
Club Member
June 4, 2012
Offline
Gilbert & Betty said
very nice
Thanks, It was actually not that much. $30 for the stop and $10 for the 3/4" d-ring. Super easy to hook up, It's made for both Poly-rope and steel cable.
David and Lori
11:28 am
Club President
April 2, 2003
Offline
Specialsoundman said
And....... My Oldest Son Matthew has completely rewired the CJ5. He also installed LED Headlights. Today we manufactured and mounted brackets for the 12,000lb winch.


Dave,
Just some advice for your project. Mounting a 12K winch on to a C channel frame will cause flex under load, and could fail. Maybe consider boxing in the front foot or two of the frame to make it more rigid. Just a suggestion. Great project!
Kathleen and Brad
4:30 pm
Club Member
June 4, 2012
Offline
BKGM Jeepers said
Specialsoundman said
And....... My Oldest Son Matthew has completely rewired the CJ5. He also installed LED Headlights. Today we manufactured and mounted brackets for the 12,000lb winch.
Dave,
Just some advice for your project. Mounting a 12K winch on to a C channel frame will cause flex under load, and could fail. Maybe consider boxing in the front foot or two of the frame to make it more rigid. Just a suggestion. Great project!
The frame under the Power steering box has been beefed up. We'll plan on beefing/boxing up the other side.
David and Lori
9:37 am
August 5, 2017
Offline

Jamie (K6NUB) said
After doing the fenders I noticed that there is quite a large gap now between the panels on the front quarter panel where the new braces are (see the picture) that i believe the old plastic inner fenders used to cover. Those who have gone with this type of setup, did you do anything to seal that off to try and keep debris out of there? Seems like it could get packed pretty quickly. Not seeing any solutions on a quick search, but I will look harder.

The only latex foam I could find would not stay in that large of a gap, so I ended up just doing a big gap filler. After cutting and shaping it I covered it with a DAP paintable elastomeric sealant (Dynaflex 230?). My test run seemed so come out well and I think the sealant will make it more durable and sealed from water, will also make the paint look better than just on foam. Here are a couple pics before paint, will be painting it tomorrow.


Jamie & Damaris 
10:38 am

September 17, 2015
Offline
Got rid of the budget boost and put 3" springs on, new isolators, new Bilsteins for the front, new lower control arms, new bushings for upper control arms, new adjustable trackbar, new stabilizer, new sway bar disconnects, new headlights, new 265/75/16 Dick Cepek Trail Country's and added a recovery rope.
Waiting on more bushings, ball joint, tie rod ends and front winch mount.
I'm just about ready to join y'all!


1:16 pm
September 17, 2015
Offline
Jamie (K6NUB) said
Jamie (K6NUB) said
After doing the fenders I noticed that there is quite a large gap now between the panels on the front quarter panel where the new braces are (see the picture) that i believe the old plastic inner fenders used to cover. Those who have gone with this type of setup, did you do anything to seal that off to try and keep debris out of there? Seems like it could get packed pretty quickly. Not seeing any solutions on a quick search, but I will look harder.
The only latex foam I could find would not stay in that large of a gap, so I ended up just doing a big gap filler. After cutting and shaping it I covered it with a DAP paintable elastomeric sealant (Dynaflex 230?). My test run seemed so come out well and I think the sealant will make it more durable and sealed from water, will also make the paint look better than just on foam. Here are a couple pics before paint, will be painting it tomorrow.
Does that foam absorb water? I may follow your lead now that I've removed the liner from my wheel wells. Seems like a pretty easy solution although I've got some massive holes to fill.
3:24 pm
August 5, 2017
Offline
Craig5_12 said
Jamie (K6NUB) said
The only latex foam I could find would not stay in that large of a gap, so I ended up just doing a big gap filler. After cutting and shaping it I covered it with a DAP paintable elastomeric sealant (Dynaflex 230?). My test run seemed so come out well and I think the sealant will make it more durable and sealed from water, will also make the paint look better than just on foam. Here are a couple pics before paint, will be painting it tomorrow.
Does that foam absorb water? I may follow your lead now that I've removed the liner from my wheel wells. Seems like a pretty easy solution although I've got some massive holes to fill.
My theory is that the foam will deteriorate from water and debris, my bet is that it will not absorb it much but it will wear away over time. My test painting on the raw foam did not look very good, it completely stood out. I use the DAP Dynaflex on the exterior of my house a lot and really like how it flexes and protects from the elements (I mainly use it like an exterior caulk). So again it is just a theory, the coating of it on top of the foam will help protect it and provide a better looking painted surface, the samples I painted looked pretty good. Paint goes on tomorrow and then we will know more. Time will tell how it wears, but I suspect it will be pretty good.
Side note, I did not do inner fenders on the rear and saw a lot of gaps that I was worried about water getting in so I sealed them with the foam and then sprayed them raw just so the white did not stick out in the black fender well, so that will tell us how the foam on it's own holds up. Now that the fender project is done, I wish I would have just bought the rear inners (assuming they they covered the holes), I wasted too much time trying to make the area look good, then seal it, then try to make it look good again... was not worth the time 
Jamie & Damaris
1:31 pm
August 5, 2017
Offline
Here's how they look after paint. It is weird that even though it is a textured and flat finish pint (same paint I used on the inner fender shown), when it goes on the sealant it comes out smooth and glossy. Feels like it is going to be completely sealed from the elements and even with the glossy finish I think it looks better, the picture makes the finish look way more noticeable than it actually is. Will see how it holds up!


Jamie & Damaris
7:52 pm

Club Member
July 14, 2016
Offline
Jamie (K6NUB) said
Here's how they look after paint. It is weird that even though it is a textured and flat finish pint (same paint I used on the inner fender shown), when it goes on the sealant it comes out smooth and glossy. Feels like it is going to be completely sealed from the elements and even with the glossy finish I think it looks better, the picture makes the finish look way more noticeable than it actually is. Will see how it holds up!
Looks good brother!
Mike G
5:54 am

Club Member
July 10, 2003
Offline
Jamie (K6NUB) said
Here's how they look after paint. It is weird that even though it is a textured and flat finish pint (same paint I used on the inner fender shown), when it goes on the sealant it comes out smooth and glossy. Feels like it is going to be completely sealed from the elements and even with the glossy finish I think it looks better, the picture makes the finish look way more noticeable than it actually is. Will see how it holds up!
Looks great!
I used to wheel a lot. . .
3:49 pm
Club Member
February 26, 2014
Offline
I think it looks great
4:07 pm
Club Member
April 10, 2015
Offline
Never know when them zombies might appear . . . previous owner did a tweaker hackjob on the dash metal when he "installed" a vegetable oil kit. Which, even if it worked correctly, is really not worth the trouble. Anyway, been meaning to try to limit the damage. . . that piece of dash metal is curved. . . so found the same piece from a donor truck, cut it to size, painted it, and pop riveted it in. Far from perfect, but. . . much better!!
Got the switch panel off ebay. . . $50 or so I think. . .not bad, for what it is. Far left is glowplugs, next to that is the high idle solenoid.


Buck & Katie
7:29 pm
Club Member
February 26, 2014
Offline
Those are actually very nice switch panels.
8:55 pm
Club Member
February 18, 2020
Offline
Finished installing ac in my 92 yj. Lots of work but worth it. Had graphics made .will post a pic . Bolted down some tool boxes behind the back seat. Just waiting till i can get it out on a good offroad area.

Jim Ruppel
7:23 pm
Club Member
February 26, 2014
Offline
A very clean YJ. Keeping it cool 
11:38 am

Club Member
January 19, 2011
Offline
Got my new Garage pad poured! New Jeep maintenance area. Yahoo!!!

Semper Fi
12:38 pm
Club Member
August 17, 2014
Offline
Josh said
Got my new Garage pad poured! New Jeep maintenance area. Yahoo!!!
Looks like a good start Josh
9:39 am
Club Member
July 10, 2003
Offline
Josh said
Got my new Garage pad poured! New Jeep maintenance area. Yahoo!!!

I used to wheel a lot. . .
3:23 pm
Club Member
July 14, 2016
Offline
Got my Suzuki building area all poured and a roof done...
Just wondering if I want to put a 2 post lift in there or not
Mike G
6:13 pm
Club Member
February 26, 2014
Offline
Very nice you guys. All a good thing to have concrete to do maintenance on.
7:27 am
July 13, 2019
Offline
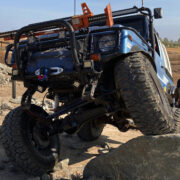
Quarantine upgrades!!!
New front end, winch, rear bumper, tire carrier. And light bar.
6:06 pm
Club Member
July 14, 2016
Offline
dolfinfire14 said
Quarantine upgrades!!!New front end, winch, rear bumper, tire carrier. And light bar.
Pics or it didn't happen....
![]()
Mike G

1 Guest(s)

